The Ultimate Guide to Designing an ADA Compliant Bathroom

A Comprehensive Guide to the Americans with Disabilities Act For Builders, Contractors And Designers

Bathroom requirements for ADA (Americans with Disabilities Act) compliance aren’t just about following the law.

Accessible bathrooms keep people safe and help them live with dignity and privacy. As you already know, multifamily apartment buildings need ADA units to meet regulations. Some single-family homes may benefit from accessible bathrooms, too.

How can you meet ADA requirements without spending a ton of money? Will including accessible features turn off buyers without disabilities?

Our comprehensive guide gives you simple steps you can follow as you purchase fittings so your team can meet ADA requirements with ease.

This will help you build a reputation for reliability and retain clients long-term.

Chapter 1: Why ADA Bathroom Requirements Are Important to Your Business

Nobody wants to ask for help using the bathroom. It’s where we’re all the most vulnerable and needing help can be humiliating.

ADA guidelines are all about creating spaces people with disabilities can use.

But some of those concepts can also apply to any home, not just ADA-compliant builds. Universal design is the idea of making every space functional for as many different people as possible.

Better accessibility is a huge selling point for homes and residential properties right now.

Universal design features also make your bathroom easier to use for children as well as able-bodied people of different heights and sizes.

By designing accessible bathrooms, you’ll empower disabled, elderly, and injured residents to take care of themselves safely without help. And that makes your project more attractive to buyers with elderly or disabled family members, and those who are looking to buy for life.

Here are a few ways accessible bathroom designs can improve your profits and your reputation as a builder.


The Cost of ADA Compliance

Let’s get this out of the way. Yes, ADA compliance can add to your upfront construction costs.

But there is a silver lining.

  1. You’ll need special kinds of sinks, faucets and showers which can cost a bit more than most standard sinks and faucets. ▶ But as you’re about to see, choosing the right ADA compliant bathroom sinks and faucets can help you sell (or rent) at a higher price.
  2. Because these fittings are not standard, they may take [your installation team] a little longer to put in, which can increase your operating costs. ▶ But with the simple guidelines in this guide - your install team can finish the job just as fast.
  3. And the biggest concern - if all those grab bars make your bathroom look like it belongs in a hospital then it’ll be harder to sell the residential unit. ▶ But as you’re about to see - “discreet” and stylish ADA compliance can help improve the value of the unit and make it more attractive to home buyers.

Let’s look at the benefits of ADA compliance for your business next.

3 Ways Accessible Bathrooms Boost Your Business

1. Accessible bathrooms make homes comfortable for a wider range of people.

Some of your clients will be looking for an accessible home because someone in their family has a disability already. Others may want a home they can live in as they age.

Not every home you design needs an ADA bathroom. But incorporating some accessibility features will make every bathroom more comfortable for as many residents as possible.

For example, many households include elderly family members. If Grandma doesn’t need help going to the toilet, everyone in the household benefits.

Accessible bathrooms mean people with disabilities can maintain their independence as well as their dignity. And with many more attractive ADA bathroom furnishings available than in the past, accessible homes don’t have to look institutional.

Knowing where to buy the right pieces means you can create a beautiful, luxurious space that’s safe and accessible for people with disabilities and able-bodied residents, too.

That means the homes you build will appeal to as many potential buyers as possible.

2. Accessible bathrooms decrease your liability for injuries.

Bathrooms are one of the most dangerous rooms in a home (source: CDC.gov).

Slip and fall accidents can be deadly, especially for elderly and disabled people.

Installing ADA fixtures adds to the workload for your team because many of the items aren’t standard. But it’s worth the extra elbow grease to protect your residents from injuries and your company from liability.

Certain universal design elements can make bathrooms safer for everyone in the home.

For example, some ADA bathroom requirements like non-slip flooring and walk-in showers significantly decrease the risk of injuries in the bathroom. And that thoughtfulness is always good for your brand reputation.

3. ADA compliance is the law.

At the end of the day, your designs need to comply with zoning, safety, and ADA accessibility regulations.

This is especially important if you routinely work on commercial or multi-unit residential projects.

ADA compliant fixtures add cost to your project. Although this feels like a burden, investing in the right pieces will help protect you from losses in the future.

Knowing where to get what you need and how to install it properly will save you the delays and extra cost that come with fixing problems after the fact.

It will also help you avoid thousands of dollars in potential fines for non-compliance.

Be sure to consult your legal advisor or Certified Access Specialist to ensure you’re fully in line with the law. You can read the standards on the ADA website for full details.

Those are just a few of the ways accessible bathroom design can boost your business and help your residents enjoy the homes you build.

Next, let’s look at some different types of disabilities and how you can incorporate their needs into an ADA bathroom design.

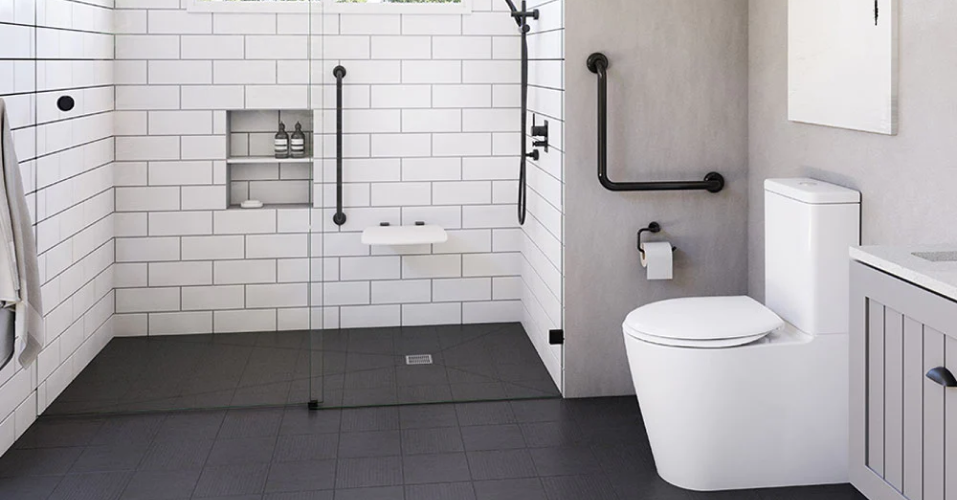
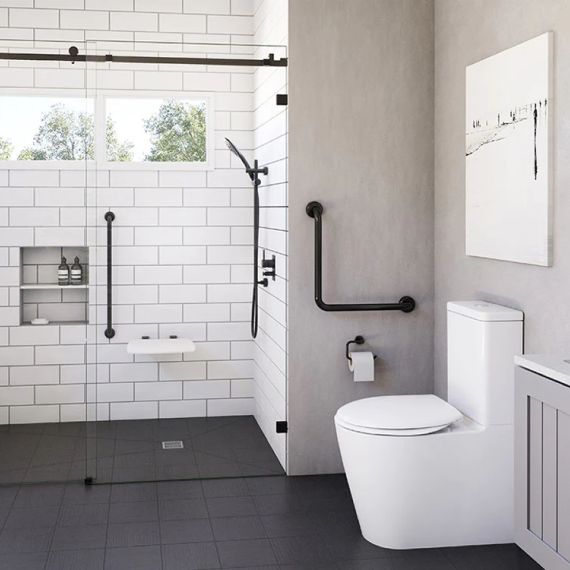
Chapter 2: Design Concepts for Accessible Bathrooms

The ADA has very clear guidelines on making bathrooms accessible for people who use a mobility aid like a wheelchair.

The problem is these guidelines don’t take aesthetics into consideration. What good is an accessible bathroom if it turns away most buyers?

The solution? Universal design. Make the bathroom easily accessible for everyone while meeting ADA requirements and creating a welcoming, attractive space.

Here are 4 basic ideas to keep in mind.

2.1 Enough Space for Mobility Aids

Bathrooms tend to be one of the smallest rooms in the house.

That makes it tricky to fit mobility aids like walkers, wheelchairs, or crutches. It might be hard for people who use these devices to maneuver without bumping into fixtures. Worse, they may struggle to get onto the toilet or into the shower.

ADA compliant bathroom dimensions give enough space for mobility aids to get through the door, approach fixtures, and turn around without bumping into anything.

Plus, who doesn’t love a spacious bathroom? A spacious layout helps any bathroom feel welcoming and luxurious, helping it appeal to any potential buyer.

2.2 Support for Aging Safely

Homebuyers, especially families, often visualize buying for life.

So they may visualize growing old in the home, or living there for decades. They may think about their aging parents and in-laws visiting from out of state.

Elder homeowners can develop balance issues, weakness in their legs, or diseases like Parkinson’s. But that doesn’t have to mean they become completely dependent on others.

ADA requirements for bathrooms call for grab bars in strategic places. This helps people with disabilities use the facilities and prevents falls and injuries due to balance issues.

By incorporating universal design concepts into the bathrooms you build, you make it easy for residents of all ages to use the bathrooms. That means young parents and middle aged home buyers alike can see how they could age in place comfortably and safely.

But that doesn’t have to mean grab bars everywhere like you’d see in a hospital. A few discreetly placed bars in sophisticated finishes and extra space in the right areas can make a huge difference without making the bathroom look institutional.

2.3 Controls That Are Easy to Use

Many disabilities make it hard to grasp and twist doorknobs and faucet handles.

People with dexterity problems may not be able to apply a lot of force when turning on the shower or flushing the toilet.

These limitations don’t simply feel humiliating. They can also be dangerous to your residents.

This is another way ADA compliant bathrooms and universal design concepts make the bathroom more comfortable for everyone in a home.

Easy-to-use controls allow people with dexterity limitations to turn water on and off, open and close the bathroom door, and flush the toilet without help.

This makes your bathroom designs more usable for people with disabilities, children who may be learning to use the bathroom on their own, and able-bodied residents who just want their bathroom to be as comfortable as possible.

2.4 Contrasting Colors That Are Easy to See

Most builders tend to favor neutral colors.

They're soothing, and provide a clean backdrop that work with a wide range of deco styles. So yes, it helps prospective residents visualize how they can personalize the room and that makes the design more appealing.

But a contrasting color palette is very helpful for people with visual impairments like cataracts and progressive vision loss that develops over time. Even legally blind residents may have very dim or blurry vision that only lets them make out shapes but not details.

Choosing bold fixtures and paint colors will help homeowners see where everything is so they can navigate through their bathroom routine with confidence.

Taking the different types of disabilities into account can make it easier to incorporate accessible features into every design. You can read more about different types of disabilities here.

Next, let’s look at what that means in each area of the bathroom.

Chapter 3: ADA-Compliant Bathroom Layout
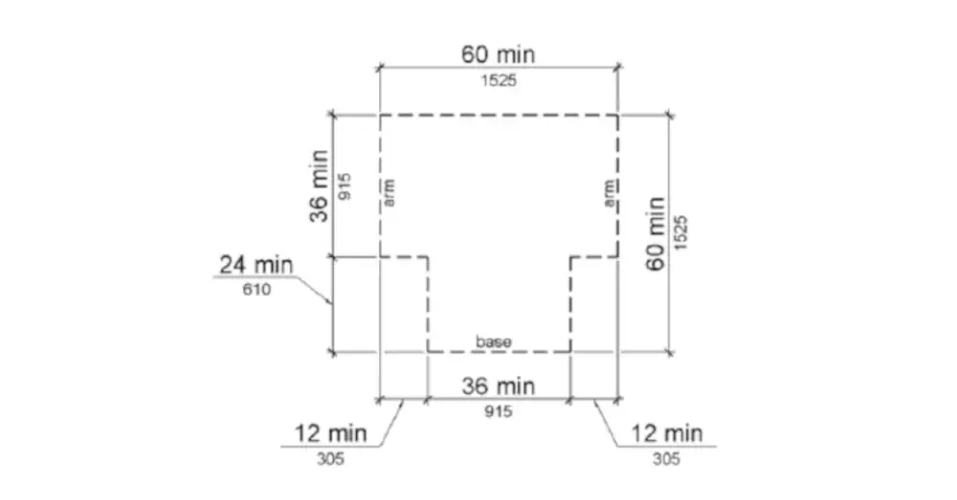
Before we get into details about what to look for in an ADA bathroom sink or where to install grab bars, let’s nail down the layout.

ADA-compliant bathroom dimensions are all about creating a space that’s accessible for wheelchair users. But doesn’t that just mean planning a bunch of extra space into your bathroom design? Not exactly.

3.1 Doorways

First, a person using a walker, wheelchair, or crutches needs to be able to get into the bathroom.

To comply with ADA bathroom requirements, your door must have an open space of at least 32”. That’s measured from the inside of the door when it’s open to the opposing door jamb.

This is the standard size for newer buildings, but older buildings may have doorways as narrow as 24”.

3.2 Turning Space

To be able to use and then leave the bathroom, a wheelchair user needs to be able to turn around completely. You can accomplish this in two ways.

First, you can plan a circular area of clear floor space at least 60” in diameter. This can be anywhere in the room, and doesn’t have to be in the center of the space.


Or, you can include a T-shaped space as shown in the above diagram.
Source: https://www.ada.gov/law-and-regs/design-standards/2010-stds/#304-turning-space

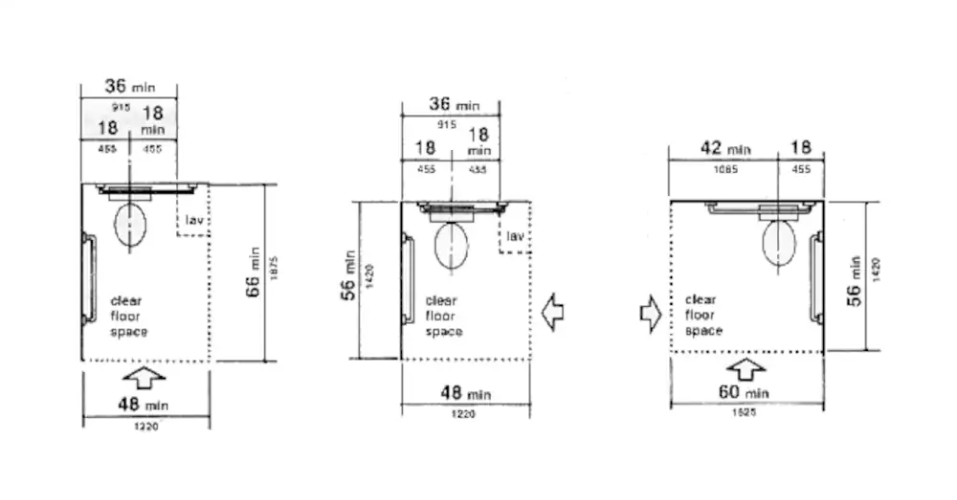
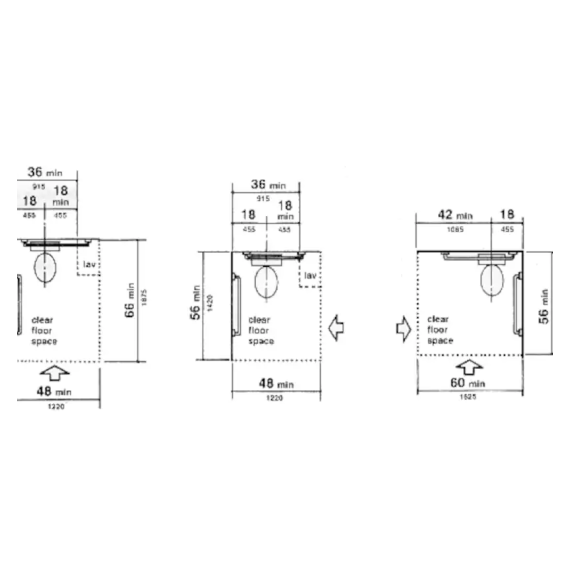
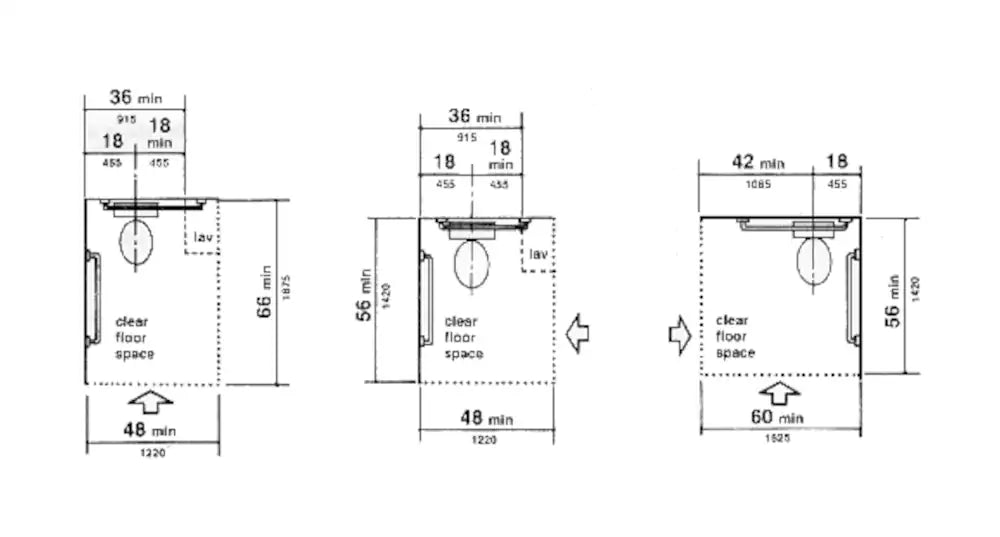
3.3 Clear Floor for Approaching Fixtures

There are three main fixtures in most residential bathrooms: the sink, the toilet, and the bath or shower.

By leaving enough space to approach each of these, you’ll help residents who use mobility aids get to them without needing help.

But how you configure that approach space also matters. For example, leaving enough clear space for a person to back their wheelchair up beside the toilet, you’ll make it easier for them to slide onto it from the side. (That’s also an easy way to reduce the number of unsightly grab bars.)

Or, you can leave enough clear space for a wheelchair user to approach from the front as long as you have grab bars in the right places for them to maneuver onto the toilet.

The exact dimensions of the clear space will depend on how you plan the layout of your ADA bathroom. You can get the full details from the ADA website.

Source: https://www.ada-compliance.com/ada-compliance/ada-water-closets.html#:~:text=Clear%20Floor%20Space%20at%20Water%20Closets.&text=For%20a%20forward%20approach%2Ftransfer,(1675%20mm)%20in%20length.

Now you know where to put everything so a person with disabilities can navigate through the bathroom.

Next, let’s look at ADA bathroom requirements for each fixture, starting with how to build an ADA compliant bathroom sink.

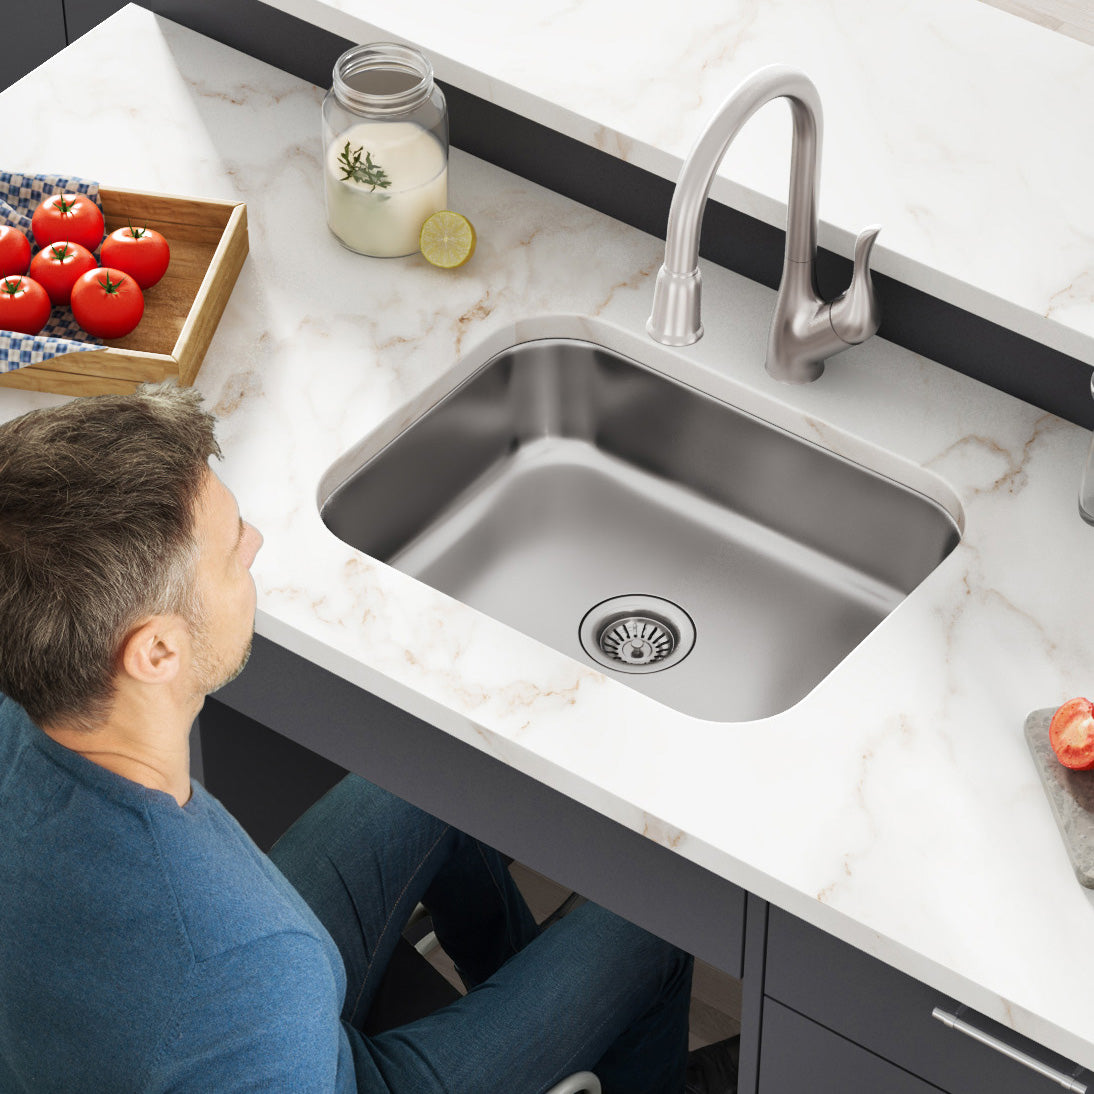
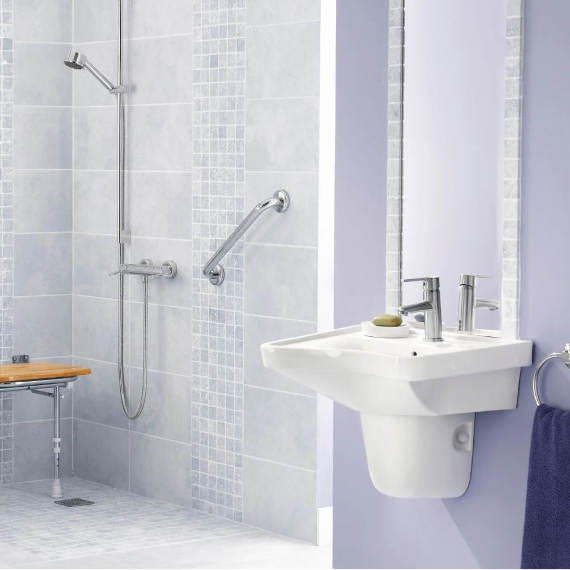
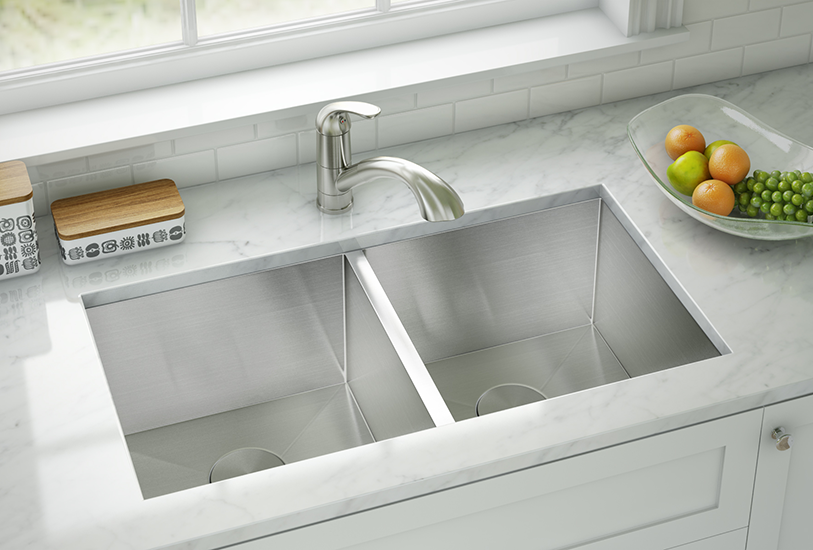
Chapter 4: ADA-Compliant Bathroom Sinks

The sink is one of the most visible parts of the bathroom. Depending on the layout, you may be able to see the bathroom sink even from outside the room.

So how can you create a bathroom sink that’s ADA-compliant but still looks great?

4.1 What Does an ADA Bathroom Sink Look Like?

ADA bathroom sinks look very much like a regular sink, but with different dimensions.

The basin in an accessible bathroom sink needs to be shallow enough to leave knee and toe space clear under the sink, as well as making sure they can reach the bottom of the sink comfortably.

An ADA-compliant bathroom sink basin can be

  • Up to 5½” deep if you’re using an undermount basin
  • And up to 7” deep for a top mount sink.

The rear offset drain is an important feature of an ADA-compliant bathroom sink, since that’s what will keep the knee space clear under the sink. Rear offset drains are also great for giving homeowners more free space under their bathroom sinks.

Buying specialized basins will help you meet ADA guidelines without extra stress.

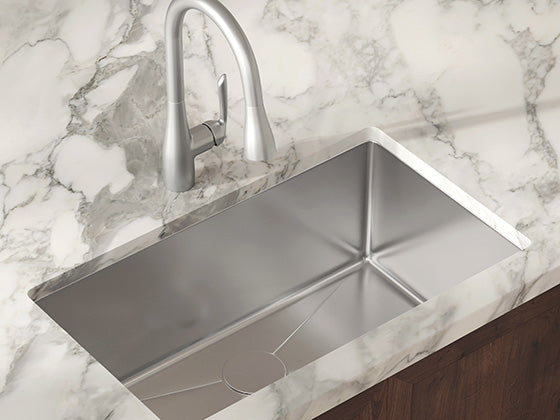
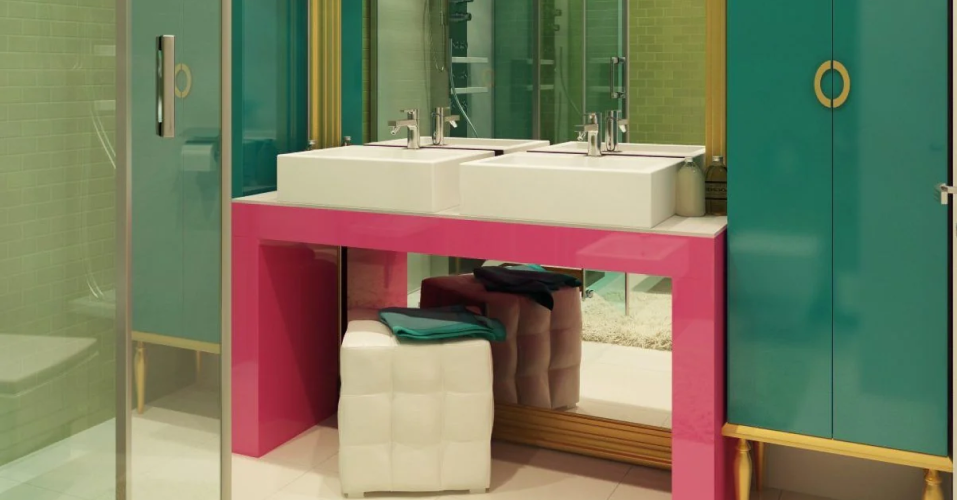
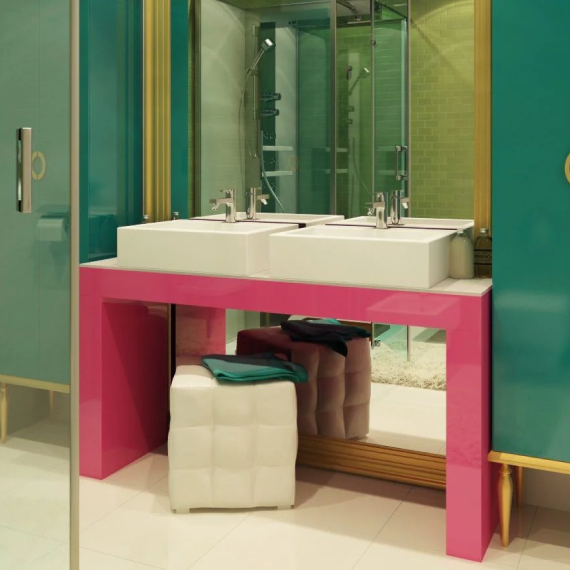
4.2 How Should an ADA Sink Be Installed?

First, let’s talk about the exact requirements for how to make a bathroom sink accessible for people with disabilities.

Here’s how an ADA bathroom sink should look when it’s installed properly:

To make your bathroom sink ADA compliant, it needs:

  • The top of the counter is 34” or less from the floor to the top of the counter.
  • At least 30” of clear space (width) under the sink for knees and toes
  • Knee space that is:
  • Toe space that is:
  • Pipes covered or insulated to prevent scrapes and burns.
  • An offset drain to keep the knee space clear.

And of course, you’d need to Leave enough open floor space in front of the bathroom sink for a wheelchair user to approach and back out without running into anything.

Depending on what style of sink basin you choose, you will probably also need a specialized vanity or cabinet to keep the space under your sink clear for knees and toes.

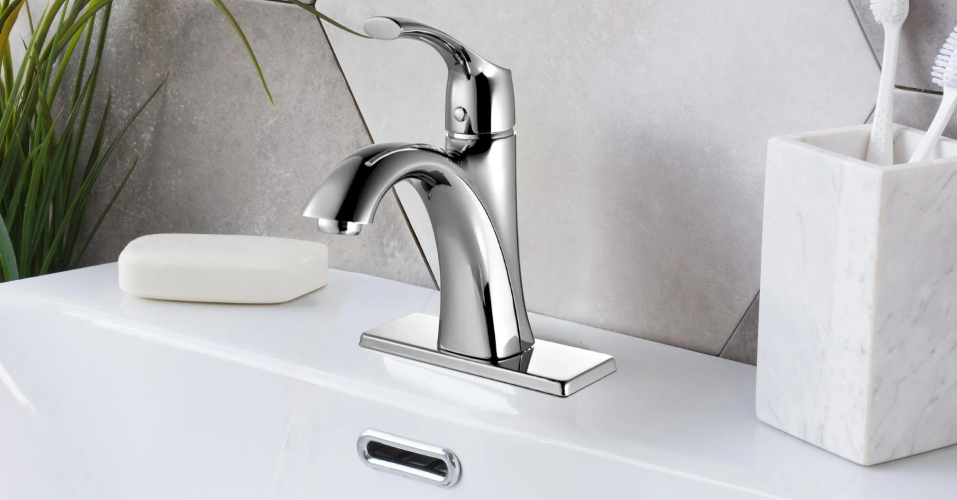
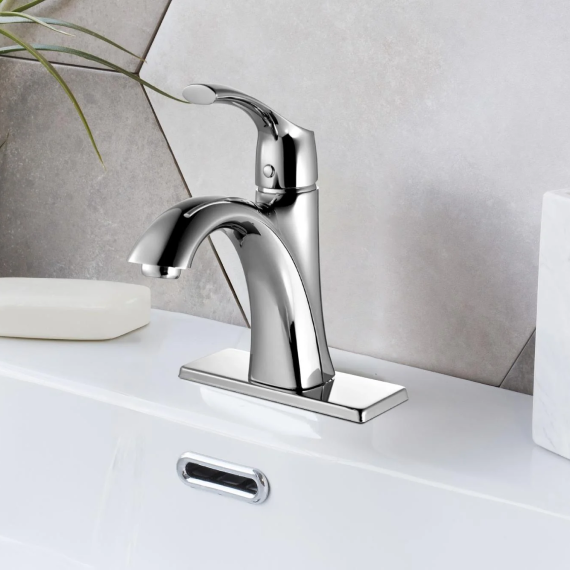
4.3 Accessible Bathroom Sink Faucets

To make your bathroom design as accessible as possible, make sure all the controls are easy to use. That includes the bathroom sink faucet.

An ADA compliant faucet:

  • Can be turned on and off with one hand.
  • Doesn’t need any grasping, pinching, or twisting of the wrist to turn on and off.
  • Needs less than 5 lbs of force to operate.

So what’s the best faucet design for an ADA bathroom?

Look for lever-style controls that can be lifted and lowered without gripping or twisting.

Single-handle designs are a great option. The homeowner will be able to turn the faucet on and off and control the temperature with one lever.

Touch-activated and touchless faucets are also excellent choices if you have the available budget. These are often a good choice for commercial kitchens or public bathrooms that see very heavy use.

Now that you know what to order for an ADA-compliant bathroom sink, let’s take a look at how to build an accessible toilet.

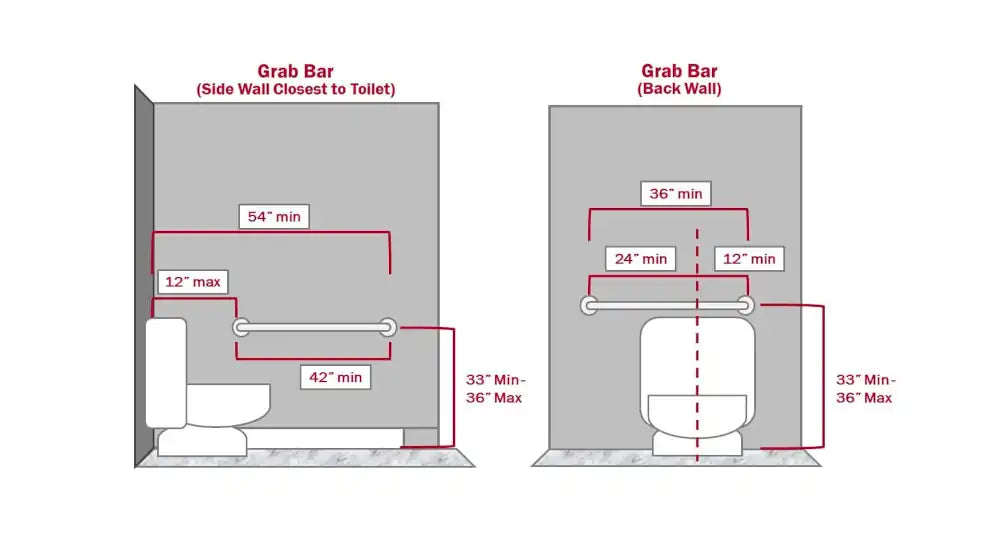
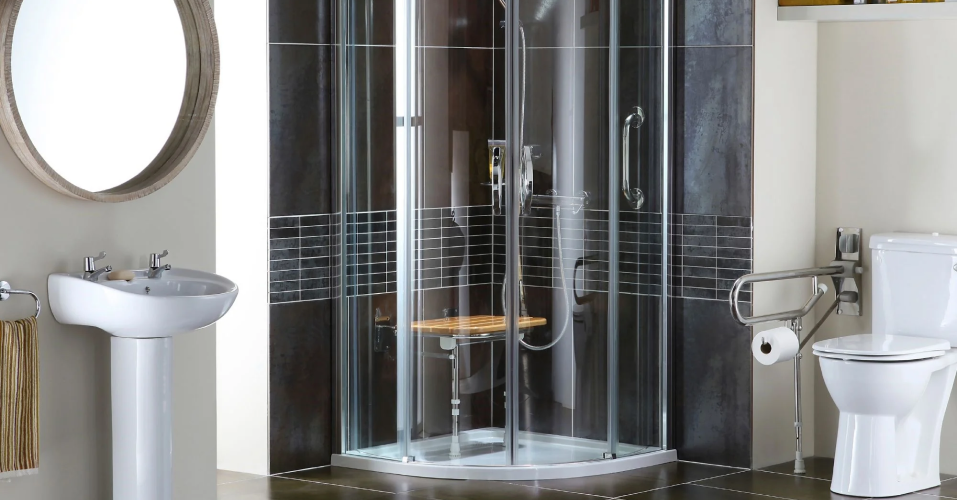
Chapter 5: Accessible Toilet Area

Most people want to keep their privacy on the toilet more than any other area of the bathroom.

So how can you make sure your ADA toilet will make things as easy as possible for elderly and disabled residents?

5.1 What Makes a Toilet Accessible?

There are 2 things you need to give residents in the toilet area

  1. Enough Space: People using mobility aids need plenty of space to approach the toilet. You can achieve this by using the layout from Chapter 3.3
  2. The Right Height: Sitting down and standing up from a low seat can be very hard for elderly and disabled people. But if the seat is too high then it’d be hard to get on or off for someone in a wheelchair.

The best solution is Comfort height toilets (AKA ADA toilets) which are 17-19” above the floor, and level with most wheelchair seats.

This is a bit taller than the standard 15-16” in most toilets, and often preferred by (otherwise able-bodied) homeowners who are taller, older, or have knee problems.

5.2 Grab Bar Placement for ADA Toilets

Grab bars around a toilet help people with disabilities lower themselves safely onto the toilet and stand up afterward.

For people with balance problems, grab bars give them something to hold onto while they adjust to a standing position so they don’t fall over.

For wheelchair users, grab bars allow them to transfer safely from their chair to the toilet and back.

There are two main places you can mount grab bars around a toilet: the wall behind the toilet (back wall) and the wall beside the toilet (the side wall)

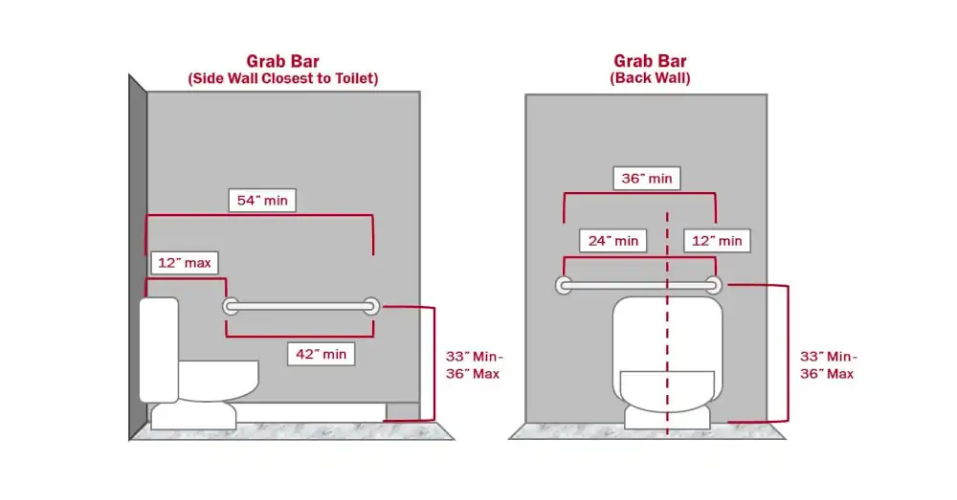
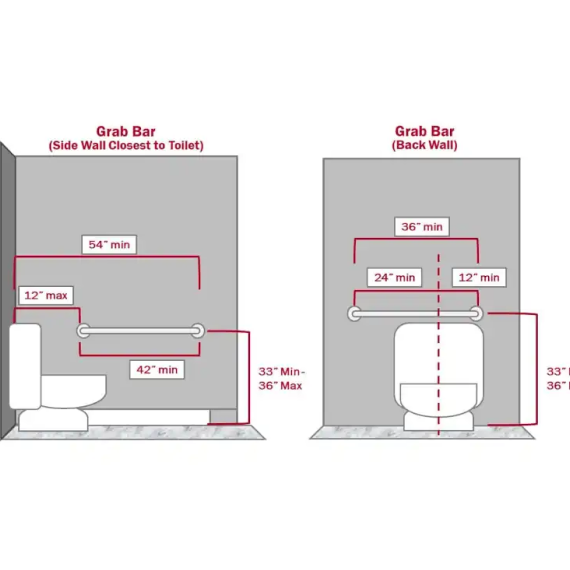
5.2.1 Side Wall Grab Bar Requirements

When installing grab bars on side walls, remember

  • The bar itself should be 42” or longer
  • Should sit 33-36” above the floor
  • Should be placed 12” from the back wall, so the end of the bar reaches 54” from the back wall


5.2.2 Back Wall Grab Bar Requirements

You can also mount a grab bar on the wall behind the toilet. This one should be:

  • 36” or longer
  • Positioned so that 24” of bar run from the center of the toilet toward the open side.
  • Positioned so that 12” of bar run from the center of the toilet toward the wall.

5.2.3 Work-Arounds and Other Considerations for Toilet Grab Bars

If your build does not have enough wall space, then you can substitute a 24” bar in either case.

Some local building codes also require compliance with the American National Standards Institute (ANSI) requirements. These codes include an 18” vertical grab bar above the side wall bar, 39-14” from the back wall.

So now you know what to look for when you’re shopping for an ADA-compliant bathroom sink and toilet.

Next, let’s look at how to create an ADA shower or bath..

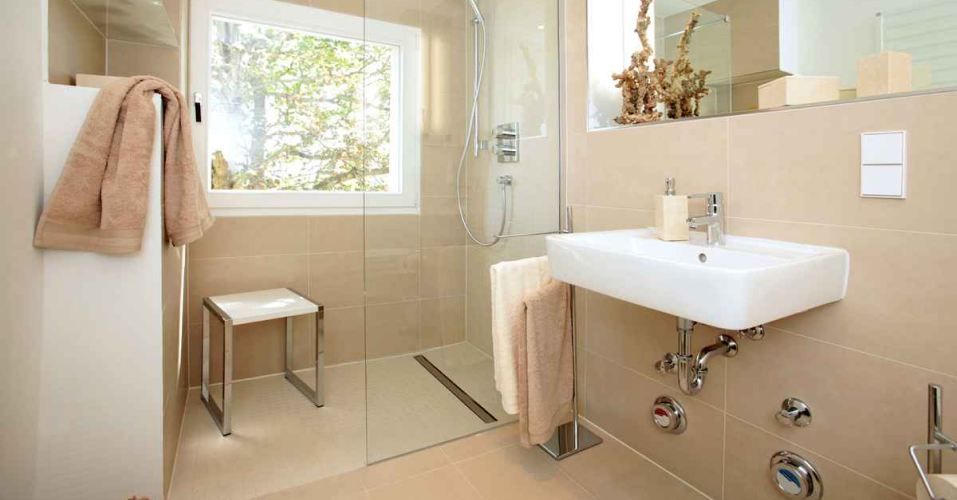
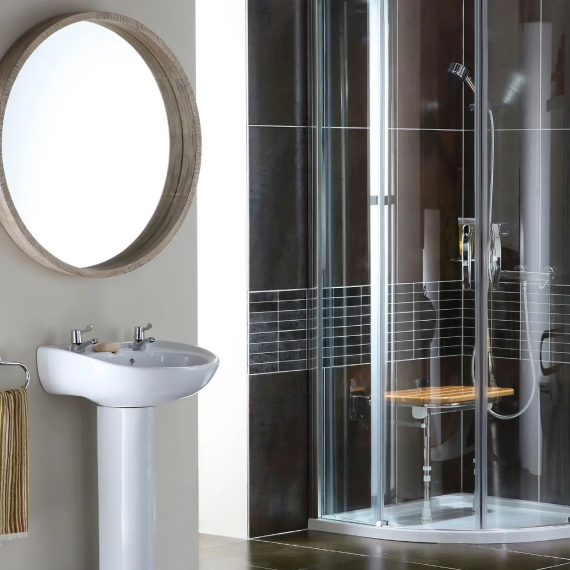
Chapter 6: Accessible Baths and Showers

Baths and showers are the most dangerous area in a bathroom. This is where most slip and fall accidents happen.

It’s also where most homeowners want an inviting area to relax and feel pampered.

Let’s simplify how to create a bathing area that’s accessible but still feels like a 5-star spa experience.

6.1 Walk-In and Roll-In Bath or Shower Designs

Obviously, it would be pretty hard for a wheelchair user to get into a standard bathtub on their own without some modifications.

Likewise, elderly people may have trouble stepping over the high wall of a regular bath.

Fortunately, it only takes a few modifications to make most showers and tubs safer and more accessible for elderly and disabled people.

6.1.1 Walk-In Tubs Aren’t Always the Best Choice

Walk in tubs can be an easy fix, but they do tend to be more expensive.

They’re also not always very “user friendly”. For example, you can’t exit the tub through the walk in door until the water drains away.

That means sitting wet in the tub for some time which can lead to chills for people with frail health.

And that also makes walk-in tubs less appealing for able-bodied homeowners. So walk-ins aren’t always a good fit for a multifamily building that has to meet a wide range of needs.

You can make a standard tub design accessible with a few easy adjustments.

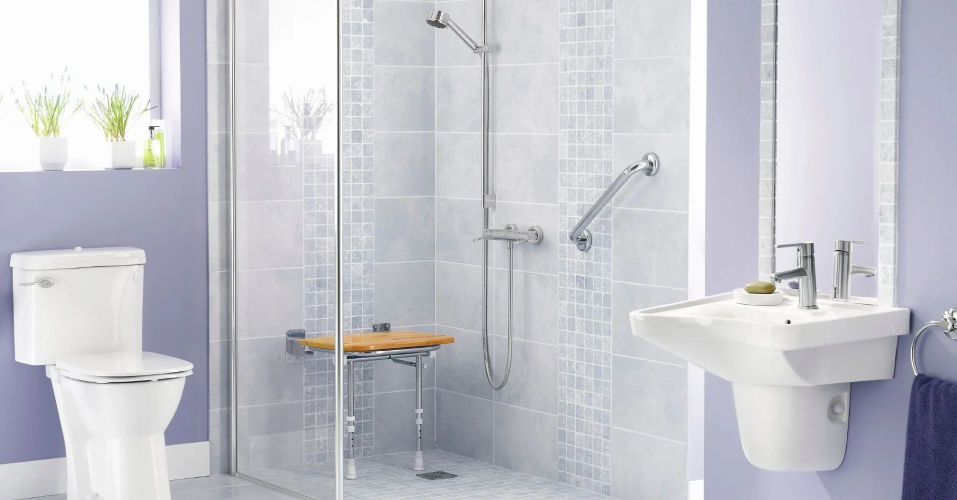
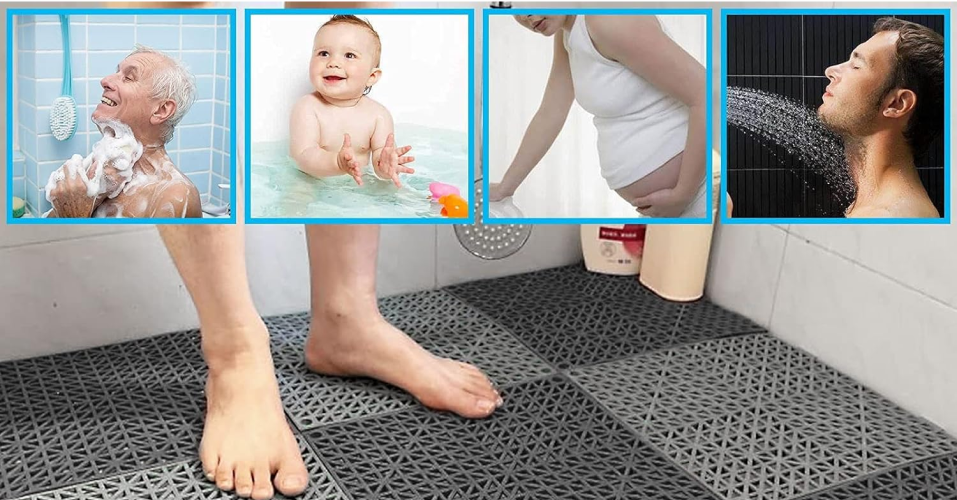
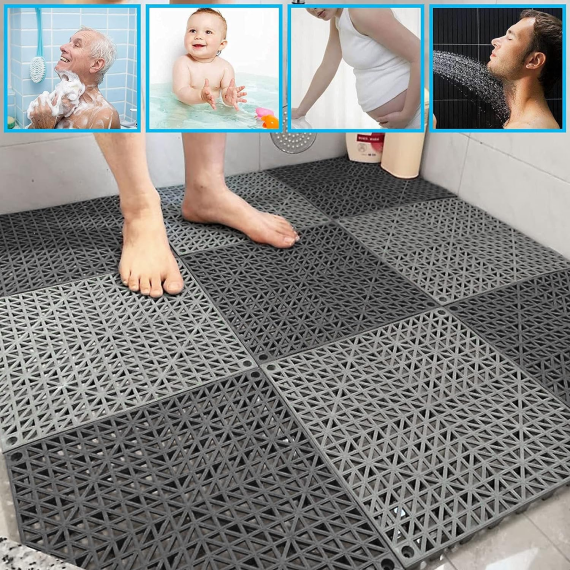
6.1.2 Making Standard Showers and Tubs Accessible

You can make any standard shower stall or tub ADA compliant.

First, make sure there’s enough space for a wheelchair to approach the shower or tub (see Ch. 3.3 for more).

Next, add a way for the resident to sit or slide over from their wheelchair. That could be a fold-down shower seat, removable seat that’s fitted to the tub, or a permanent built-in bench.

This seating needs to be within reach of the faucet controls and showerhead, so be sure the head of the tub or shower is on the side that’s accessible by a wheelchair and not hidden behind another fixture like the toilet.

6.1.3 Walk-In showers need minimal customization

Walk-in showers are also easy to install and don’t need much customization to be ADA compliant.

By adding grab bars, non-slip surfaces, and seating within reach of the showerhead and faucet controls, most walk-in showers can be accessible.

Just be sure the showerhead and faucet controls are within reach of the seating and on the side that’s approachable in a wheelchair.

6.1.3 How Is a Roll-In Shower Different?

An alternative approach is to build a roll-in shower.

That means the shower is big enough to accommodate a wheelchair pulling all the way in and then closing the shower door or curtain.

It also means the shower doesn’t have a high threshold, as the ADA limit for thresholds is to ½” and properly beveled.

While that does make it easier to install bathroom tiles, most people (except those in wheelchairs) do prefer a higher threshold.

On the other hand, roll-in showers do not need added seating.

6.2 Best Faucet Choices for ADA Baths and Showers

Just like sink faucets, shower and bath faucets in ADA bathrooms should be easy to operate.

Single-handle, lever-style controls are always a great choice for everyone, and not just for ADA compliance.

6.2.1 Shower Head Height

The ADA does have a requirement that shower heads should be reachable from a seated position.

A low showerhead would be inconvenient to most homeowners though. So you may want to add a second, lower showerhead for ADA compliance.

Adjustable-height showerheads are also a great option for most homeowners, although that might add to your budget.

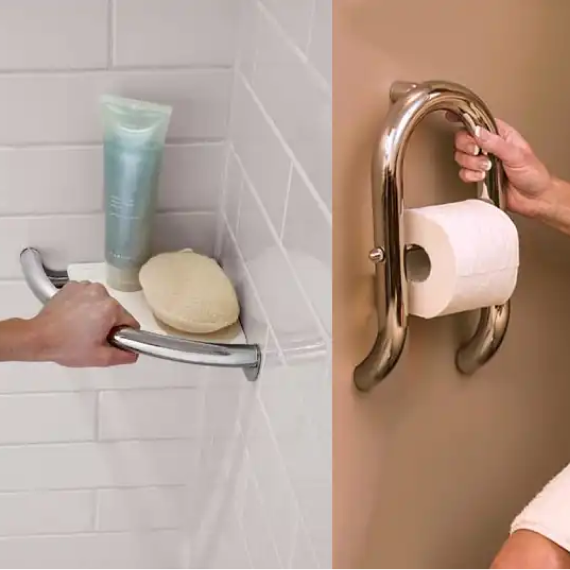
6.3 Grab Bars In Baths and Showers

You need to add grab bars for residents with mobility issues.

Where and how depends on the size and layout of your bathroom.

The rule of thumb is residents should be able to reach the grab bars from a seated position.

And although it’s not required by the ADA, we also recommend discreet grab bars that can also be used while standing. Especially in the shower area where elderly residents are most likely to slip. After all, the shower is the most accident prone area of the bathroom.

6.4 Non Slip Tiles and Surfaces

Speaking of accidents, you also need to use flooring that reduces the chances of slipping.

Textured tile, mosaic and subway tile, and textured shower bases work equally well - while also delivering a beautiful and luxurious bathroom.

This is another reason why walk in and ADA compliant showers are often a better choice, especially if you’re working on a multi-family build.

That being said, you can find tubs with a non-slip surface at the bottom.

Now that you have the main areas of the bathroom handled, let’s look at a few final considerations to be sure your bathroom is as accessible as possible.

Chapter 7: Lighting, Switches, Mirrors and Flooring

Other than the sink, toilet, and shower, there are a few more features that can make your bathroom inviting and comfortable for the widest possible range of users.

7.1 Lighting

The ADA also has some requirements about lighting fixtures to keep people with vision impairments safe.

If lighting fixtures, sconces, or towel racks stick out too far, people with vision problems can run into them. So fixtures should be low-profile to prevent injuries.

Bright lighting in bathrooms also helps make the room easier to navigate for people with vision loss.

Plus, able-bodied people will appreciate great lighting when they’re putting on makeup or shaving their face.


7.2 Switches and Outlets

Simple rocker switches and touch-activated switches will do for most bathrooms, provided they don’t need much force to use.

There are several kinds of specialized accessible switches, but they can be expensive.

The best height for bathroom Switches and outlets is around 40” off the floor.

That makes them easy to reach from a wheelchair, and meets the ADA requirements (under 48” from the floor)

And if you want to add a switch or outlet above the counters, the ADA recommends positioning them 15” above the counter.

You can also choose accessible outlets that make it easier for people with dexterity problems like arthritis to plug devices in.

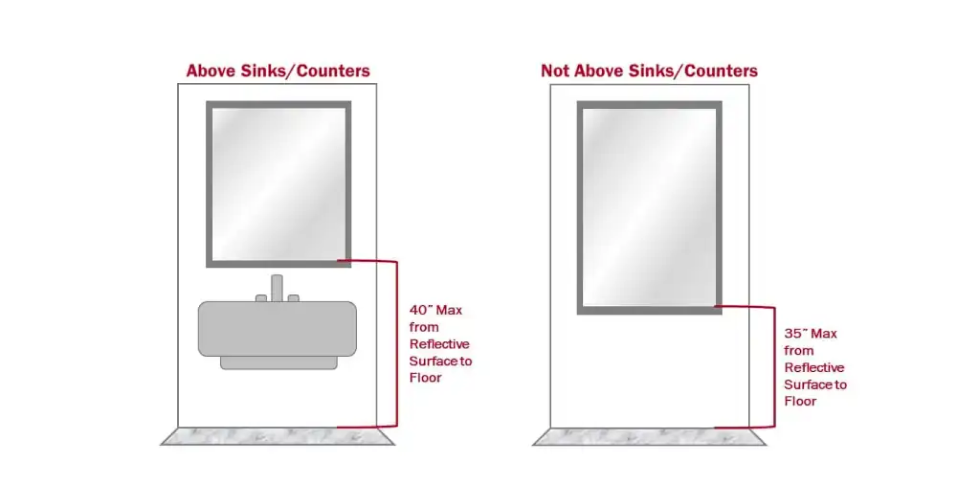
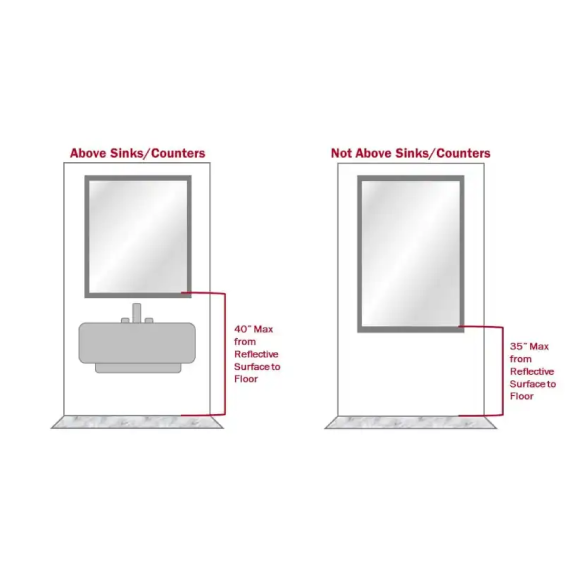
7.3 Mirror Placement

Wheelchair users may have trouble seeing themselves in the mirror, as do younger residents and shorter residents.

A big mirror above your ADA bathroom sink will help the room look spacious and luxurious.

It’s also a great way to make it accessible for wheelchair users.

Most households have people at different heights, so large mirrors that extend all the way down to the sink backsplash will help everyone in the home.

7.5 Flooring

Just like in the tub or shower, all flooring in an ADA compliant bathroom design should be non-slip.

Wood look vinyl, textured tile, and rubber are all great options. Bamboo creates a luxury spa experience and provides a slip-resistant texture, too.

If your design calls For stone floors (e.g. granite), a textured finish provides better grip, and can feel far more luxurious.

Now that we’ve covered the essentials for ADA bathroom requirements, let’s talk about how to make accessible bathrooms that appeal to everyone in the home.

Chapter 8: Making Your ADA Bathroom Design Work for Everyone

ADA bathrooms have a bad reputation of looking institutional.

But as we’re tried to show you throughout this guide, that doesn’t have to be the case.

Grab bars in particular don’t have to leave your bathroom design looking better suited to a hospital.

Accessibility features are more popular than ever before, so it’s not as hard to find options that can blend into your aesthetic. For example, Our full selection of ADA bathroom sinks will bring the same gorgeous results to your ADA units as to standard units in any project.

Choosing adjustable options - such as adjustable-height showerheads and modular storage under the bathroom sink - lets your bathroom work equally well for all residents.

So that’s it! Now you know how to make your bathroom designs accessible for all potential residents and keep your project compliant with the law.

Now let’s answer a few common questions about ADA bathroom design.

Chapter 9: Frequently Asked Questions

Q: How can I make sure my bathroom design is ADA compliant?

A: The ADA has clear guidelines and checklists on compliance, but they can be hard to understand as they’re written in very technical language.

And that means Unfortunately, in many cases, you won’t know that your design is not ADA-compliant until you’re dealing with a complaint.

Purchasing ADA compliant fixtures is a great place to start, but of course you also have to install them correctly. Our handy guide can help

So, If you have a legal obligation to make your units ADA compliant, then it can be worth getting a Certified Access Specialist or other ADA compliance expert to review your blueprints during the design stage, and the build during the installation stage to ensure that your design is fully compliant and prevent potential problems down the road.

Q: What does an ADA bathroom sink look like?

A: ADA bathroom sinks need to be usable while seated.

They look very similar to regular sinks, except they’re shallower and the drain is at the rear instead of the center.

They’re also installed lower to the ground with more clearance underneath for knees and toes.

The under sink area needs to be clear of drain pipes, supply lines, and other obstacles. The faucet should have a single, lever-style handle for easy use, or handles that can be controlled with minimal pressure and without grabbing or pinching. You can get full details in Chapter 4.

Q: How do ADA bathroom requirements make bathrooms safer?

A: ADA requirements for bathrooms include safety features like non-slip flooring that prevent slip and fall accidents.

Grab bars, especially in the shower, also prevent falls by giving the homeowner something to stabilize themselves if they feel dizzy or weak.

Choosing a single-handle faucet for an ADA bathroom sink is a great way to prevent hot water burns.

Following ADA requirements for bathroom lighting fixtures and objects that stick out from the walls and ceiling help prevent people from running into things and hitting their heads.

Q: Is it possible to add ADA bathroom features without making the bathroom look like a hospital?

A: Yes! There are more options than ever for accessible features that don’t detract from your design. For example, stylish, high-contrast grab bars can look stylish instead of institutional.

We offer the same beautiful bathroom sinks in standard and ADA compliant models so your entire build offers the same welcoming homes to all future residents.

Q: Will ADA requirements for bathrooms make my project more expensive?

A: Not necessarily. There will be added costs for items like grab bars which you otherwise wouldn’t need at all.

But in many cases you can modify standard designs to meet bathroom requirements for ADA compliance without a lot of added expense.

For example, our ADA bathroom sinks and faucets have comparable pricing to standard models. So you can get everything you need to meet ADA bathroom specs for a gorgeous sink without breaking your budget.

We’ve laid out the basics for how to build your ADA-compliant bathroom, provide enough space for residents who use mobility aids, and generally make your bathroom designs safer.

Now let’s bring it all together.

Chapter 10: Pulling It All Together

Accessible bathroom design helps everyone feel more comfortable in their home, which means you’re able to sell it at higher profitability.

It’s also an essential part of helping people with disabilities maintain their independence and dignity. It’s also great for business.

The most important things to remember are:

  1. There are several kinds of disabilities, which can be permanent or temporary, or develop as we age.
  2. Universal design principles help turn regular homes into something special, and can help you sell at higher prices
  3. It can be worth having your designs checked by an ADA specialist, especially if you’re building multiple units, because any legal trouble down the road can also be multiplied.

How We Can Help You Create Beautiful ADA Bathroom Sinks

Accessible bathroom design has many complex requirements, and you want to be sure to get it right the first time.

But ADA compliant bathroom sinks can be difficult to find. Especially if you’re working on a multi-unit project, the right supplier can save you time and money.

We’re proud to offer ADA bathroom sinks and faucets alongside standard models so you can get everything you need in one place.

Plus we offer:

  • Discounts for commercial projects.
  • Guaranteed stock.
  • Lifetime quality guarantee.
  • Guaranteed pricing.
  • 30 day money-back guarantee.
  • Free shipping to most areas in the US.
  • Delivery within 5 days or less anywhere in the US.
  • Unlimited phone and email support.
  • If you want help creating a beautiful ADA bathroom sink, contact us! We’ll connect you with dedicated support so you can find the perfect options for your next project.
Back to blog

Not sure which sink or faucet is right for your build? Unsure which accessories you need?